The Very Basic Counter-Strike War Strategy Guide
(100,000th hit Anniversary Celebration Edition)
This is an introduction to Competitive Counter-Strike War Strategy & Tactics. It includes important definitions, terminology, keyboard binds, rcon alias / aliases, FAQ's and other useful information about Counter Strike and the strategies you can employ.
Version 3.15.00
Last Update 07November2005
What this Guide is:
This guide is meant to explain many of the common mistakes new and even experienced clans make, which can affect the outcomes of wars you play in, usually in the negative if you do not heed this advice. It also explains some basic buying strategies so clan leaders can call for something specific and after studying this guide, everybody will know what they are talking about. For the most part you require no skill whatsoever to execute the advice offered here, only a modicum of intelligence and concentration.
What this Guide is not:
This is not a strategy guide that will walk you through how to play a war on any particular map, nor is it designed to teach you how to play wars if you have not experienced playing in them. It is not going to teach you where to stand, how to aim, shoot, or throw grenades. It does not claim to be the final word on the subject on the common mistakes that cost clans wars. These are just made up from my own experience, and I am sure that there is plenty more that can be added.
Finding 5-6 commited players who want to play as often and as seriously as this guide suggests you need to if you want to do the best you can is extremely difficult.
The amount of practice and discipline required, can cause a lot of friction between team members who want to do the best they can and those that only want to play for fun or to mess about. I strongly suggest you assess exactly what sort of clan you wish to be or be in before attempting to follow or have people follow anything presented here.
Thank You.
Table of Contents
Definitions
AK RUSH
Buy AK and Armour and rush hard.BUY UP
Get Rifle, Full Armour, HE Grenade, Kit/Flash Grenade, Partial Primary Ammo, Flash, Full Primary Ammo, Smoke.CHOKE POINT
A choke point is a point in the map where the action is concentrated into one small area, eg. On de_dust - the CT entrance to tunnel near the doors is a choke point. Also a point on the map where a whole team can be held by 1 or 2 opposition players only, or a point also know as a deathtrap, (the room between the 2 sets of double doors at long A on dust2 is a good example of a deathtrap) where if two or three HE Grenades come flying in, your whole team is dead or as good as, and the round is effectively over without even firing a shot.CLUTCH
Win the Round when the odds are stacked against you. The more the odds are stacked against the player or the more important the round win, the bigger the clutch.DE RUSH
The Desert Eagle Rush where you buy Desert Eagle and Armour, and rush if you think opponent is weak in a particular Area, that might enable you to win a round back after loss of previous round.ECO
DO NOT BUY ANYTHING, ESPECIALLY GUNS!!ECO RUSH
DO NOT BUY ANYTHING, ESPECIALLY GUNS!! RUSH HARD.FAKE
Terrorists creating a diversion to make it appear that a particular bombsite is the primary objective. Against Bad Teams the FAKE Bomb site often becomes the primary, after your 1 or 2 players anihilates the opposition. Also used by Counter-Terrorists to make it appear that they are holding a particular area of the map strongly.GG
"Good Game". General courtesy extended to the opposition at the end of the war for playing against you. Also used to indicate that the war has ended and the player/clan intends on leaving the server, because a result has been achieved. Teams and players who do not say GG at the end of a war (no matter how bad or good they did) are considered impolite and poor losers.GH
"Good Half". General courtesy extended to the opposition at the end of the first half of a war.GOBLIN
Sneaking your way in for a bomb plant or a bomb defuse. Also used in the context of outflanking the opposition in a manner that is wholly unexpected, usually due to stealth, eg. Hiding while all opposition runs past you, then shooting them in the arse.GL HF
"Good Luck, Have Fun". General courtesy extended to the opposition at the beginning of the war for playing against you.LO3
Live On Three. The typical method used to commence a war, where the round will restart three times before beginning after the third restart.MP5
Buy MP5, Full Armour, HE Grenade, Kit/Flash Grenade, Partial Primary Ammo, Flash, Full Primary Ammo, Smoke.MR12
Maximum Rounds Twelve: Twelve Rounds maximum will be played per half before you change sides.MR15
Maximum Rounds Fifteen: Fifteen Rounds maximum will be played per half before you change sides.COVER
Cover means 2 things: You either stand right in front of the guy you are covering so you get shot first, or cover a point on the map so the enemy must engage you before they see the guy you are covering!OT
Over-Time. If the combined total of both halves results in a draw, then Over-Time is played. This usually consists of Max Rounds Three, mp_startmoney $10,000 rules.PICK
The art of picking off your opponents one at a time who are camping in high probable positions with a pre-aimed shot, or camping a spot waiting for the opposition to appear in a very tightly defined kill zone.POINT
The guy at the front.PUSH
Moving into an offensive position rather than a defensive position. Usually used to describe Counter-Terrorists who have moved out of the normal defensive position in an attempt to out flank the opposition.ROTATE
How Counter-Terrorists reposition their team mates in an attempt to redress a perceived or actual tactical disadvantage. eg. Losing a player in a key position will cause the Counter-Terrorists to rotate a player from a less key position, to fill the void left by the dead team mate.STACK
Stack means you put all your eggs in one basket and place most, if not all your players in the one area of the map, either as in a Terrorist RUSH or protecting one Bombsite only as Counter-Terrorist.TD or TEAM DOWN
When one player kills the entire opposition in a single round. A TD in a CLUTCH situation on the round that decides the map in a final, is about as impressive as you can get.
Basics
- Kill the enemy. Do not shoot, grenade or flash your own team.
- Ego is possibly the biggest down fall of many a clan. For some reason, many people think they are so much better than everybody else, and don't have to do a lot of the simple things it takes to win. Get over yourself, you will learn quicker and be more successful, if you treat the opposition with respect.
- Don't rely on having faster reflexes and aim than your opposition to win wars. Far too many clans think this is all they need and quite often this is all they have got. Clans that over-rely on the AWP tend to have too many of these types of players.
- Learn the maps, the choke points and how long it takes to get to them. Know the camping spots, the bomb planting and defusal positions, and how to navigate the map without actually having to see where you are going.
- Learn what the various choke points on each map you play on are. Learn how to gain control of them early and how to hold them. Learn the timings for moving to and through them are and the time it then takes to reach a bombsite once the choke point has been breached. Also know how to take a choke point back if you need to with more than just superior reflexes and aim.
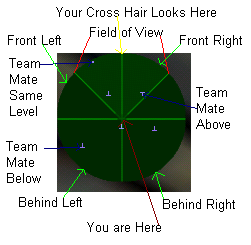
- Learn How to use your Radar (See Description Below) to determine position of Team Mates and the enemy. You know where the enemy is when you see a dot disappear off your screen.
- Have Scoreboard bound close by your movement keys so you can easily check team and enemy numbers quickly, without having to take your hand off movement keys.
- As Terrorists you should be skin 2 (L337 Krew) as Counter-Terrorists its Skin 4 (French GIGN) in order to cover your numbers. 5 guys popping in and out 1 at a time will look like the 1 guy if you all have the same skin. L337 Krew is the skinniest and hardest to see model most of the time, French GIGN has the smallest head for Counter-Terrorists and a head similar to the Phoenix Connektion Terrorist skin.
- Some maps allow you to determine early what the other teams defence and offence strat is going to be. Figure out which maps these are and how to do it.
- Don't pick up enemy guns if somebody else in your team needs it. If you pick up enemy gun, do not drop it again, because you will keep all the bullets, and the gun is practically useless to whoever else picks it up, because the gun won't have any spare ammo.
- Do pick up guns that enemy drops, if none of your team needs the gun. If you have time, empty and drop them to deny enemy a gun with bullets if they pick it up, since all ammo stays with the person who drops the gun, so long as they are alive when they do it.
- Do pick up guns of dead people to top up your own ammo, but make sure you reload first. Very important on wall spam maps like de_nuke.
- Know which guns share ammunition to maximise the benefit of the previous points. eg. (Colt, Clarion, Defender, AUG, Para) (USP, UMP) (Glock, MP5) etc.
- Don't stand in front of AWP'ers, crouch or get out of the friggin way.
- You absolutely must learn how to use ALL grenades, I cannot stress this strongly enough. Most good teams base their whole strategies around placing specific grenades into specific locations at specific times, they hardly ever rely on just being a better shot than the opposition players. Just about everybody in a half decent clan can aim and shoot when they are supposed to. If you don't throw a HE/Flash Grenade(s) to make them move, or Smoke Grenades to obscure their vision, they will have you pre-lined up for a headshot, and you will lose the majority of these encounters.
- Learn How throw the various grenades so they land where you want them from various positions on the map. This includes knowing what angle you need to use to achieve a certain effect, as in banking off a wall or throwing them at a certain angle so they land where you want it to. You ought to know how to put a grenade where you want it without putting yourself in danger.
- Keep your cross hairs pointed at head height. Many good players get a lot of kills merely by holding their crosshairs in the correct position. Remember, it takes time to move your mouse, the less time you have to spend moving your mouse the quicker your shots will be and subsequently your kills as well.
- If you are relying on being a better shot and out-aimming the opposition players, then you have missed the whole purpose of why this page has been written.
- Not dying is a skill too! Learn how to get yourself out of no-win situations, or better yet, not place yourself in no-win situations in the first place. 1 live player on 1 health is eminently more useful than a dead player!
- If you are a really good player trying to offer advice to your not so experienced team mates, don't just yell at them and call them a n00b when they do somethin stupid or wrong. Tell them what they did wrong, what you would have done differently, and exactly why you would have done it the way you described. Point them here if you have to! If you do not know exactly why you would have done something a certain way, then that is worth investigating and intergrating into your playing technique. The whole raisons d'etre for this guide, was to map out exactly the things to do or not do to improve me and my clans playing.
Organisation
- Get a plan and stick to it. Practice that damn plan, and test it to exhaustion in practice wars to see if it actually works and has the outcome you expect. Have alternate plans if it is obvious that your original plan is never going to work. Like finding out 1 site has 3 AWP's in it and you have no smoke grenades.
- Don't be afraid to dump a plan if it doesn't work for your clan, so long as you give the plan a real chance to work. Remember the goal of having a plan is to win rounds with the minimum of casualties to your team, thereby winning you the war. It is very hard to win wars, if your team constantly dies, even if you happen to win the round. The money system will eventually grind you down.
- Get organised. Its no use having the best strats on the face of the planet, or the best players in the world, if you are a disorganised rabble, with everybody doing their own thing. Practicing your strats is the easiest way to do this. Everybody knowing the order things should be done is good, since if you have to use a substitute, you reduce the amount of explaining you have to do, and any re-organisation you have to do, won't upset things too much.
- Timing is everything. A simple strategy executed with precsion is always going to be more effective than any strategy that is poorly executed, no matter how good that strategy is.
- Start simple and work your way up. Just do simple flashbang pushes, where you smoke to cover you and then put 1 flashbang in after another at selected locations, all the while making sure you have team mates with guns out, in position, ready to take advantage of where the flashbang has been thrown.
- Have somebody call the play. Really good clans will already know what it is they have to do, but it still requires that somebody call at the start of the round what it is your clan is going to do that round. Have back up callers in case your main strat caller dies. I've seen clans fall apart because the main strat guy dies and then nobody knows what it is they are supposed to be doing.
- Some strats for both Counter-Terrorist and Terrorist depend upon where you spawn. Learn what the obvious strat will be depending upon where you spawn on each map. Examples are: Dust, Dust2 and Prodigy for both Terrorist and Counter-Terrorist, Train for Terrorist, etc.
- Instead of assigning specific roles to specific players, get used to assigning roles by player position instead. eg. 1st player goes back left, 2nd player goes right, 3rd plants bomb, 4th backs up player 2 and 5th hangs back to cover the rear etc. etc. Then if one or two of you die, your strategy does not fall into a complete mess. The same priciples work for both Terrorists and Counter-Terrorists and helps to avoid situations like there only being 3 of you left as Counter-Terrorist on dust2 and all trying to retake B through the double doors.
- While you are dead and at the start of the round, discuss with your team, the location and disposition of the enemy and start working on game plans to defeat what the enemy is doing. eg. Where are the Counter-Terrorists camping the bombsite. Have they done the same the same thing 2 times in a row? What plans in your arsenal do you have to defeat their defences? etc.
- Learn to use smoke grenades to provide COVER from AWP's or to just cover your movements and numbers. Learn where you need to place them to be effective. Learn where not to place them, so you do not screw up your own team. In Counter-Strike 1.6, the smoke is not as thick as it used to be and runs out quicker, but starts up a hell of a lot faster, you usually need 2 smoke grenades to provide the same thickness of smoke you used to get in previous versions of Counter-Strike.
Money Managment and Spawn
- Do not buy immediately, wait for the call from the person calling the strats and listen to the call. The worst thing you can do is have a gun when the rest of your team has pistols, or vice versa.
- Person calling the strats needs to call quickly whether you are ECO or BUY UP ASAP.
- Have buy binds for things like all grenades, defuse kit (since it swaps positions on the buy menu), usual guns, and the 2 different levels of armour.
- Do not replenish your armour at the start of each round. 50% armour is just as effective as 100% armour. Only re-buy your armour if you get down below 30% (because at this level or lower, you may actually run out of armour before you die) or you weren't able to afford full armour with a helmet (something I believe is a failure in the game, as you should be able to buy a helmet separately, without having to buy a new vest as well).
- If you win a MP5 round and intend to buy a rifle the next round and none of your team requires your MP5, drop it at end of the round so the gun cannot be retrieved the next round.
- You can increase the teams ammo capacity if you swap guns and buy ammo at start of round for guns that do not share ammo. eg. Colt, AK and AWP.
- BUY UP on last rounds or sudden death rounds regardless.
- Request Rifle while dead or ASAP in spawn if you die and your team is winning. You need the cash to buy armour and grenades, and not having to buy rifle gives you the spare cash to do so.
- State your cash in Team Chat ASAP and at start of each round, so the person calling the strats will know how much you all have and be able to make an informed decision.
- If you have $4,500 or less, ask your team for a gun at the start of the round so you can afford full armour, grenades and a defuse kit. There is no excuse to not be fully kitted out if your team is winning, and you will be more useful to your team.
- If you have over $5,000 and are already fully geared up, offer to buy Rifles for rest of team, ask "Who needs a Gun?" You are a lot better off with team mates that have weapons that actually damage and kill the enemy.
- If you have over $10,000 and are already fully geared up, it is very important that you buy Rifles for anybody who has only $7,000 or less. You cannot save more than $16,000, therefore it is better for the teams total cash reserves that you buy a gun for somebody else, rather than have somebody deplete their personal cash reserves when you have so much cash in hand. Feel free to ignore this if you all have over $10,000.
- Learn to calculate the enemies cash position by paying attention to what weapons they had and how difficult or easy it was to kill them. i.e. Did they just lose after ECO for 2 rounds? If so, then its likely they will ECO the next round.
- Always pick up dropped AWP's if you are winning round or have won it. At respawn drop picked up AWP for your clans AWP'er (DO NOT BUY GUN, unless of course you have a lot of cash) Unless they are low on cash, Clan Awper Buys Rifle for the person who drops AWP.
Communication, Sound and Movement
- Get your Microphone working. You can be the best player in the world, but unless you can communicate where the enemy is and in what numbers, you are only half useful, and you are dead when the rest of your team gets annihilated because you didn't tell them the enemy was coming and you are left all by yourself.
- When communicating enemy positions, be precise, and give numbers of players, and weapons when possible.
- Count off dead enemies, start off with 5 Terrorists/Counter-Terrorists, when one dies count one off to yourself, if you are not under pressure announce number of opponents over voice comms, by saying "4 Terrorists", "3 Counter-Terrorists" etc.
- Bind a Radio key, preferably something like; "Enemy Spotted" or "Need Backup" close to your movement keys, so your team mates radar will highlight your current position.
- Pay attention to who kills who with what sort of weapon. Use this information to your advantage. Also if you know where your team mate was shot from with a particular weapon, tell your team the location of that opposition player.
- Call your status out, eg. "Reload", "Throwing Grenade", "Throwing Flash", "Throwing Smoke", "Blind", "I have X Health" etc.
- Other than what I have stated above and below, keep voice and radio chat to an absolute minimum, so your team can pick up enemy sounds as early as possible.
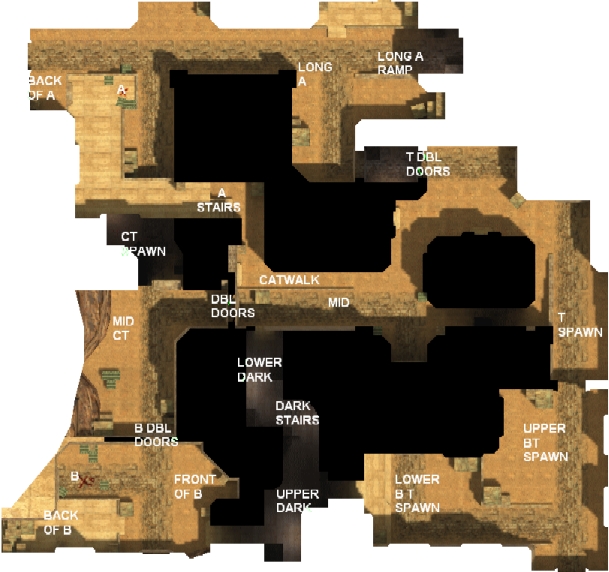
- Have your team agree the names of map positions so everybody knows what you are talking about in the previous points. Even go so far as labelling a map (as shown in the example below) and put it on a web site or transfer it to each of your members some how. You don't even have to agree with the names I given to these locations (dust2 if you're not aware), just as long as everybody on your team knows wtf you are talking about. I may even make some for the war maps later if hassled enough, but don't expect anything to grand.
- The overview images for the warmaps can be downloaded from here. (1.4MB File)
- Unless rushing in a group, good players when they come around a corner only reveal the absolute minimum of themselves for the shortest time possible, to pick off the next likely camping position. Map knowledge is crucial in this regard and a skill that requires constant practice.
- Don't run behind each other, fan out in as widespread a pattern as possible, so you can't get owned by a single player. You may want to disobey this deliberately if you have a specific flash rush strat, but I think it will be rare.
- Don't block your team mates in, the guy in the line of fire has right of way.
- Do stay as close as possible to your team mates when attacking without blocking your team mates.
- Don't run with your knife out, at least have a pistol out.
- Do run from spawn at the start of round with your knife out when it is your intention to get to a choke point as soon as possible.
- Don't make any noise whatsoever unless you really really have to, (This applies equally to Counter-Terrorists, as it does to Terrorists) one foot step, zoom sound, or weapon switch is all it can take to alert the enemy to your position. This includes throwing grenades, shooting, and switching weapons unnecessarily.
- You can move quickly when there is a lot of gun fire and grenades going off as the sound of Gun Fire, Especially AK's, which will cover the sounds of your footsteps. It is one of the reasons why people use silenced Colts in wars.
- Another reason to use a silenced Colt, is so you can hear the thud of your bullets hitting the enemy when you are shooting through walls, etc.
- Do make a lot of noise if it is your intention to act as a decoy or create a diversion.
- Learn to tell the number of opponents by the sounds of their footsteps. Its easy to pick a lone opponent versus 2 sets of running footsteps, which in turn can usually be differentiated from 3 or more, at which point you are going to be able to say, "there are at least 3 enemy at location X".
- Don't break Windows and Vents when you are close to them, or you need them intact to alert you to possible enemy movement.
- Do break Windows and Vents when you are far away from them and its to your advantage that they punched out. Punching the top vents on de_nuke as Counter-Terrorist, the bottom vents of de_nuke before you plant in the bottom site as a Terrorist, the Vent in the Counter-Terrorists Sniper nest on de_inferno as Terrorists are good examples of these. Don't punch the bottom vents as Terrorists on de_nuke, if there is only 1-2 of you left, since you do not have the player numbers to COVER like you would if you had 4 or 5 players left alive.
- It can be advantageous to pick up other teams guns, so if you are a Terrorist you have a Colt or if you are a Counter-Terrorist you have an AK, since you may get a slight delay in response because opponents cannot tell your gun sound from their own teams gun sound. This slight delay in response time can make all the difference.
- Don't allow yourself to get picked off from obvious camping spots. Learn to know where these camping spots are and avoid them when possible.
- Don't stand still to take on a camped enemy. You will just get spammed to death along with the rest of you team. The entrance to site B on dust2 from the tunnels is a classic example of why you don't stop to take the guys camped outside B double doors. You will die and cause the rest of your team to die as the get stuck behind your lifeless body.
- POINT should be a guy with a rifle excepting special places on maps where an AWP'er should go first. In which case the point man should act as a fast moving decoy to attract fire from snipers, and let your snipers have a free shot.
- POINT always watches the front, and sweeps all corners as you move around map, rest of team watches spots opposition can appear from once the point guy has swept that spot, UNLESS
- Whoever is last in line, looks backward to COVER your backs and should also have a Rifle, unless you are going to hang right back with a AWP.
- Pair up, and make sure you pair up a strong players with a weak players. The weak players should be the point and act as decoy for strong players.
- Baiting is a legitimate tactic in wars, especially if it enables your team to eliminate the best player on the opposing team for the loss of only one of your own and preferably weakest players. Done often enough, it destroys the confidence of the good player and demoralises the opposition.
- When working in pairs, the front guy should be crouched while the guy right behind him stands. Guys in front should generally be crouched when working their way quietly around a map. Feel free to ignore this if your location is well and truly known to opposition.
- When working in pairs approaching a single sided corner, learn to work out the correct distance you need to be so the inside guy and far side guy reveal themselves at the same time. The inside guy needs to be at the front.
- When approaching entrances with 2 sides, the left hand guy looks right, the right hand guy looks left. I know this sounds like really basic stuff, but I've seen this screwed up often.
- Do shoot close and far corners of walls, doors and boxes as you move around the map, to push opposition players out of position. Practiced enough, you can even get kills this way.
- Do spam walls and boxes of likely camping positions of enemy players as you move around the map.
- When spamming, do not have the whole team doing it at once, learn to alternate between yourselves and only empty half a clip at a time, then reload. This ensures that somebody has a gun out with ammo, and you can cancel your reload sequence if the opposition comes, and not be entirely defenceless.
- You must learn what the good positions on a map are, and what the bad positions on a map are, and you must learn not to get caught out of position that leaves you in a situation where you are going to die for little or no value. eg. Dying without getting a shot off = bad. Dying and killing 3 of the enemy = good. M'kay?
- Know what positions on the map are DeathTraps! Move through these positions as quickly as possible. As soon as the enemy knows you are there, you will be wearing several HE Grenades and that can effectively end the round for you team. Do not be afraid to surrender these positions and fall back. It is often advantageous to cause the enemy to think you are moving into ones of these locations to get them to use up their supply of HE Grenades.
Terrorist Notes
- When spawning as Terrorists, everybody should be COVERing entrances to make sure you don't get rushed while you decide what to do.
- Do not buy Glock Ammo EVER!!.
- If the Counter-Terrorists ECO stacks 1 bomb site, don't take them on. Plant the bomb at the other bombsite, then kill them.
- The teams AWP'er(s) NEVER carries the bomb! Unless of course you all have AWP's.
- By rights, your weakest player ought to be the bomb planter, since your better players ought to have their guns out shooting people and not be out of action planting the bomb. Don't feel bad, I'm my clans bomb planter, since the rest of the clan are better shots than I am. :)
- Decoys and Players COVERing away from main body of attack should constantly communicate their position and the position, numbers and disposition (are they pushing up, rushing or holding back) of the enemy.
- If you are hard rushing, only the first 2 guys should be throwing Flashes/Smoke and HE, otherwise you just end up screwing your own team up.
- Drop the bomb in a safe location if you are not 100% sure you will be proceeding in a certain direction.
- If your team drops the bomb, and you need to pick it up, when you get close to the bomb, throw your gun down and pick it up to make the pick up sound to draw camped Counter-Terrorists out of their hiding place.
- The bomb carrier does not lead the charge nor should they be last, they should be the 3rd or 4th person in, so bomb does not get dropped in a heavily defended position, or gets there too late or taken out in back play. If you lose 4 guys without taking out at least 3 Counter-Terrorists or damaging them severely, you are probably going to lose the round no matter what.
- If you are not hard rushing, the bomb carrier should be doing the flashing. As I have explained before, he can't be the decoy, and most likely not have an AWP either. He should be 3rd or 4th in line, which is where you want the Flash guy to be.
- With the new money system in 1.6, it is important that Terrorists plant the bomb, especially in the early rounds. Actually its important to plant the bomb every round, and almost equally important that Counter-Terrorists now stop this from happening. As it is now not the complete disaster for Terrorists it used to be, if they lose the round after planting the bomb.
- The new money system works like this:
- If you Die without Planting the Bomb, you get $1400 (which increases by $500 per round for every subsequent round lost, to a maximum of $2900) + $300 per Kill
- If you Plant Bomb and Die and Counter-Terrorists Defuse and Lose, you get $2200 + $300 per Kill
- If you Plant Bomb and Die and Win with Bomb Exploding, you get $3500 + $300 per Kill
- If you Plant Bomb and Die to Bomb and Win, you get $3500 + $300 per Kill
- If you Plant Bomb and Live you get $3500 + $300 per Kill
- If Kill all Counter-Terrorists without planting the bomb you get $3250 + $300 per Kill
- If you Plant Bomb and Live and Kill all Counter-Terrorists BEFORE bomb goes off you get $3250 + $300 per Kill
- If you Plant Bomb and Live and Kill all Counter-Terrorists AFTER bomb goes off you get $3500 + $300 per Kill
- Please let me know if I have got any of those numbers incorrect.
- Don't run to the bomb site with the bomb in your hands and your back to the likely spots the Counter-Terrorists will appear from or where they maybe camped. Bombsite B on de_cbble is a good example of where this happens a lot.
- Protect the bomb planter at all costs. Don't run off leaving them all alone or with no COVER.
- Plant the bomb as wide out in the open as possible. Or previously specified points as per map tactics.
- Do plant the bomb in a hidden spot when you are the last man and you know the opposition is closing in quickly and/or its a 1 v 1 or 1 v 2 situation. You have to make a judgement call here, as to how much time you have to plant.
- Know where to absolutely NOT plant the bomb. There are certain spots on particular maps that you should avoid planting the bomb at all costs. de_train is a good example of having specific parts of the bombsite where you should avoid planting the bomb, since it is possible for the Counter-Terrorists to defuse under almost complete cover with no visual clues that the bomb is being defused. This also includes avoiding bomb planting positions which result in silent planting of the bomb, which will cause your clan to forfeit a war in the GameArena Counter-Strike Ladder
- Be very circumspect about planting the bomb if you have not killed any Counter-Terrorists and you are pretty sure they haven't ECO'ed. Again, make sure the bomb planter is well COVERED while they are planting the bomb.
- Announce bomb plant position. Eg. Dust2 Site A you can plant for Long A or Stairs defence.
- Once the bomb is planted, the aim of the game is to delay! delay! delay! Do not engage the enemy if at all possible, just do everything you can to delay the Counter-Terrorists from trying to defuse the bomb. Try not to die doing this.
- Know where the hell you should be once the bomb is planted. Do you really need to be standing next to the Bomb carrier when they plant the bomb? Is there a better position near the bombsite you ought to be in an attempt to stop the opposition retaking the bombsite?
- Check scoreboard and announce enemy numbers and likely incoming locations.
- Use flashbangs as Terrorists to defend planted bomb.
- Use unused smoke grenades to defend planted bomb by throwing them in direction enemy will come from, but in such a way that it doesn't affect your view of the incoming enemy. Do this if for no other reason than to drop the fps and lag out incoming opposition.
- Shoot the corners of walls, boxes and doors of the likely incoming direction of the Counter-Terrorists, as this will delay their approach and likely to damage or possibly kill them. In any case, it will delay the Counter-Terrorists re-taking of the bombsite. Shooting the crates at BombSite A Stairs, from the BombSite on de_dust2 is a good example of this.
- Don't defend the planted bomb, when you can do it from a safe location. Snipers should COVER long range, rifles should COVER short-range attack. eg. BombSite A plant on Dust2, Sniper takes care of Bomb, AK guy COVERs T Double Doors, split team evenly with emphasis on protecting planted bomb. eg. If we have 3 players left, 2 watch the bomb, 1 watches their backs at double doors.
- When you cannot defend from a safe distance, the guy with the least to lose and/or the most money, should stay near the bomb until the last possible second to ensure the bomb does not get sneakily defused.
Counter-Terrorist Notes
- Buy defuse kits, otherwise pick up defuse kits off the ground if you don't have one.
- If you move from your assigned spot as a Counter-Terrorist, communicate your location as you move around the map.
- Don't completely abandon your assigned bombsite when you hear that the other bombsite is under attack until the bomb is planted. The attack on the other bombsite may just be a fake. So leave at least 1 man in or near the bombsite to keep an eye on it in case that was the Terrorist plans all along, or they just change their minds on a map that allows them to do so easily. eg. de_inferno. Listening to your teams calls are crucial. Forget all that if your team has been wiped out from the other bombsite, since it will be highly probable that is where the Terrorists will end up planting.
- If you are a Counter-Terrorist and the bomb is dropped, inform your team immediately. If the bomb is dropped in your favour, everybody on the Counter-Terrorist side needs to converge on that area via the safest possible path as quickly as possible and camp the bomb from the best positions available in that area.
- As Counter-Terrorist, relay to your team the bomb carriers location if you know where they are, or the fact that you have spotted the Terrorists but do not see the bomb carrier.
- Don't defend the bombsites as Counter-Terrorists exactly the same way, every round. You need some variety to your defence, or the Terrorists will wise up (if they even remotely clever) and you will get picked off with grenades, or shot through a wall.
- If you get rushed, use flashes to buy yourself time for re-enforcement's to arrive, or to allow you time to escape. Throw in front of rushing enemy to slow the rush down, or to thin their numbers out, to reduce the numbers that you have to deal with at any one time.
- Don't die to 4-5 man Terrorist rushes, unless you have a really good spot, its better to fall back and have 5 Counter-Terrorists to take back the bombsite than to die needlessly.
- If you cannot defuse the bomb in time, or even get close enough to the bomb in time, stake the bomb site out to pick off fleeing Terrorists. At the very least, and this is EXTREMELY IMPORTANT, try to make as many of Terrorists as possible buy again the next round.
- This piece of advice is for both sides, if it is not possible to win the round, make the other team suffer as much as possible by killing as many enemy as you can, or have them die to an exploding bomb, to try to ruin their economy as much as possible. This can make or break clans in wars. eg. If a Clan wins a round and BUY UP and wins again, their players might have around $3000. If they win again without dying, each player on the winning team will have over $6000, if they win the round but die, they will now use up most of the $6000 they had, restocking guns, grenades and armour.
- If you have ECO'ed and are completely out gunned, but still have 5 people left, and the bombsite permits this type of strat, don't even attempt to defuse the bomb as a Counter-Terrorist, but attempt to keep the Terrorists boxed into the bombsite so the bomb explosion kills them. You were most likely going to lose the round anyway, but having all the Terrorists die, forces them to rebuy from scratch, therefore forcing the Terrorists into a likely ECO round if you win the next round after this one. Of course don't do this if its the last round of the half or sudden death round.
- If its 2 v 5, and bomb in planted don't try to defuse, unless it is the last round of the half or sudden death and you have nothing to lose, meet up and camp a position outside bomb site to pick off as many Terrorists as possible.
- If there 1v5, unless it is the last round of the half or sudden death and you have nothing to lose, and you have a good gun and/or armour, run away and hide, or pick safe camping spot to pick off fleeing Terrorists.
- The fastest beeping sounds of the bomb timer means you have approx 7 seconds left to defuse, don't even bother if you don't have a defuse kit. It takes 5 second to defuse with a defuse kit, 10 seconds to defuse without a defuse kit. The defuse timer has to be over 1/3 the way along before the fast beeps start if you are defusing without a kit, otherwise you die.
- If the bomb is planted, as a Counter-Terrorist, don't try to enter the bombsite alone. Try to organise yourselves quickly, look up on scoreboard at how many Terrorists are left and announce via voice comms numbers and likely locations, then communicate what grenades you have, your entry point, and which direction you will head when you enter the bombsite. Grenade and Flash at the same time, and enter bomb site together, and head for your designated point to attack first, so you aren't all aiming for the 1 guy while rest of the opposition shoot you all in the back. This is difficult to do, unless you practise a lot, but it will be the difference between thinking you are good and actually being good, and can prove it. Really good clans have all this stuff prearranged with way points and entry timing and they are left only calling enemy positions. Most clans panic when the bomb has been planted. How quickly and smoothly you can retake a bomb site is an excellent demonstration of your clans skill level.
- Try to kill all Terrorists before you begin defusing.
- If you have time, check corners for hidden campers, waiting for you to start defusing.
- Announce the fact to your team that you have a defuse kit.
- Let the person with the defuse kit defuse the bomb no matter what. If they kill the bomb defuser the defuse kit will be on top of the bomb.
- If you are going to defuse, call out loudly that you are going to go for the defuse, to make sure you don't have 4 of your team running for the bomb and you all get shot in the back by the one hidden terrorist.
- Use Smoke Grenades to Cover the Bomb Defuser.
- Leave your defusing until the last second, so the Terrorists must stay near bomb site and even if they kill you, the bomb still goes off and kills them, forcing them to BUY UP.
- Crouch when defusing, you are a smaller target.
- COVER the bomb defuser, by surrounding him from points where he can be attacked. If there is no opposition left, run away in case he stuffs up, or it is close.
- Don't chase the last Terrorist(s) that are miles away from the bomb site, if the bomb has been planted. They will not usually be an immediate threat, so defuse the bomb or help COVER your bomb defuser. There is a good chance that this lone Terrorist will kill you and then kill the bomb defuser straight after they have defused the bomb, because the bomb defuser will be in a poor position if the bomb is planted correctly and/or just not ready to take on an opponent, so what should be an easy round win ends up being a round win that costs you more than it should have. An example of this is Counter-Terrorists chasing a Terrorist who is up the ladder in the Terrorist Sniper Nest or in the tunnel below it on Inferno after the bomb has been planted.
- Use your Smoke and Flashbang grenades for cover and to slow approaching Terrorists while you are trying to defuse.
- To summarise the order you should select personal (assuming you have time and options) to defuse:
- Person closest to the bomb with Defuse Kit and most health and most money and weakest member of team
- Person closest to the bomb with Defuse Kit and most health and most money
- Person closest to the bomb with Defuse Kit and most health
- Person closest to the bomb with Defuse Kit
- Person closest to the bomb
Source Notes
- The maps are considerably more complex than they are for 1.6. The basic layouts have remained the same, but there are now a lot more nooks and crannies that have to be checked or taken into consideration when moving around the map, and objects strewn all over the place that restrict your movement and require avoiding.
- All Source Grenades follow a flatter trajectory than their 1.6 counterparts.
- All Source Grenades do not fly as far as they do in 1.6.
- All Source Grenades do not bounce anything like their 1.6 counterparts do when banking them off walls and objects. Sometimes they bounce more, sometimes they bounce less.
- HE Greandes do no damage if you hit somebody with them. They do damage people when they explode though.
- Flashbang Grenades do damage if you hit somebody with them.
- Smoke Grenades do damage to armour if you hit somebody with them.
- Flashbangs blind and deafen you and causes your screen to show a picture (an after image of what you were viewing at the time the flashbang went off) that does not accurately reflect reality.
- Turning away from FlashBangs doesn't do anything to avoid the FlashBang effect
- HE Grenades are more powerful, and also deafen you.
- HE Grenade blasts do not penetrate walls.
- Smoke Grenades are back to the older 1.3 version where they take longer to fully display the smoke, but is thicker than 1.6, and tactically more useful.
- You can see where to aim through smoke by aimming at the oppositions muzzel flashes. If you are spamming through smoke make sure you move after each volley, otherwise you will get picked off.
- Use the fact that Grenades deafen the opposition to cover your footsteps.
- Grenades will eliminate the momentum of a player who is in mid air if it hits them.
- Grenades can be recovered from dead players from either team, so it can be worthwhile keeping and eye out for them, even going so far as using your own supply up, so you can pick them up to deny the opposition access to them, otherwise you may find them being used against you!
- The recoil patterns are different to 1.6.
- Knifing is completely different to 1.6. Don't ask me how it is different, it just is.
- Footsteps are a lot quieter and very difficult to pick up.
- Shadows enabled allow you to see people well before you come around the corner, so be on the lookout for them. Left Hand Side, going down Dark Stairs on Dust2 is a classic example. Be aware that your good camping spot can be given away by your shadow, so know which spots cast shadows that will give your location away. Currently you will need your teammates to tell you what spots cast shadows that enable you to be seen and from where, as you cannot see your own shadow.
- Be aware of the locations and positions you are in, where shadow clipping bugs occur.
- There is no Bomb pickup noise currently.
- Hold the fire button down outside the defuse area and the bomb will automatically arm as soon as you get within the bomb planting area. You really should know where you ought to be planting before you even play in a war, but its still useful.
- The Bomb Planted beeps now can be heard from a lot further away now.
- The defuse sound is no longer as audible as it used to be at distance. You have to be considerably closer than in 1.6 to use the defuse sound as a cue to engage the bomb defuser. In most cases you will see them, well before you can hear the defuse sound cue.
- The way people move through the air is different when they jump in 1.6. You need to be aware of this when trying to aim at people jumping around.
- Ambient Sounds which cannot be turned off in Source can cover your footsteps to a certain degree.
- Many walls cannot be shot through like they could in 1.6, although the edges of them usually can be. Don't waste ammo trying to spam people through the wall like you would in 1.6, it will get you killed.
- Most doors and boxes can still be shot through as in 1.6.
- Objects on the maps provide significant amounts of tactical uses, either for the benefit of blocking a choke point, making it more difficult to locate and defuse the bomb, showing that the opposition have passed through a particular area, used to fake the fact you have passed through a particular area.
- Many objects cannot be walked over or jumped on top of, even though normal visual inspection would cause you to assume otherwise, eg. Car Tire, Barrels.
- Doing a "crouch-jump-crouch" will enable you to get on top of boxes that a normal jump-crouch cannot reach.
- You currently cannot select your skin in Source, only the team.
- It is a lot more difficult to tell the 2 teams apart, especially at a distance compared to 1.6. You really need to learn to use your radar well!.
- The Netcode for Source is horribly broken and outside the scope of this article to explain it, the person you think is wall hacking probably is not. You just happen to appear to be on their screen even though you could not see them, and died because of it.
- The Ammo stays with the Gun in Source. If you buy a gun for a Teammate buy Ammo for it as well if you can afford to. It also has the effect that you cannot pick up extra ammo buy picking up and dropping guns.
Other
- All of the above might sound like a lot, but the more you practice, the better you will be at it, and the more you will be able to soak up the information and act accordingly.
- To practice your aim try http://www.missionred.com/ and choose Reflex_2 if you can get past level 10 then your aim won't be the reason you lose. Also you can play Quake 3 CPMA one of the fastest FPS there is. Both of these will improve your aim and reflexes.
- I acknowledge there are contradictions in this document, mainly due to the fact that what will work in one situation may not work in another. In the end you have to use your own judgement as to what you are going to do, depending upon the situation you are in, how many players are alive on your team, their condition and what weapons you have. Experience is your best guide.
Very Basic Buying Strats
The buy strats are very very basic. They are there to introduce newer players to certain concepts involving the economics of Counter-Strike. Furthermore, they usually will not hurt you that badly to follow them anyway, not unless your versing a really good clan, in which case you don't need my buy strats, you ought to know your own off by heart, or you are going to get whipped regardless.
1st Round
Counter-Terrorist, is usually 1 HE, 1 Flash, 1 Defuse Kit, 1 extra clip ammo for 3 players the rest get 2 Flash and no defuse for re-taking bomb sites. Sometimes you may want to mix it up with guys who have armour. Suffice it to say, you do not need 5 defuse kits amongst your entire team for the first round.
Terrorist, is usually Glock armour for majority with 1 or 2 getting grenades and those with grenades are shepherded by the ones with armour. i.e. 2 Armour guys at the front, 1 Armour guy at back. Alternatively, you get 2 with Glock armour, 2 with Grenades, 1 with DE or USP, or some combination of these.
2nd Round
1st Round Win (1-0)
For 2nd round MP5 it
You don't buy a rifle, cause if you die, you give opposition your rifle and they can then win that round.
Use extra flashes either to defend planted bomb or to get you into a bombsite
WARNING: If you are a Counter-Terrorist this strategy is very susceptible to the DE RUSH. My only advice is that if you are playing at a level where teams can pull off a DE RUSH successfully, you should have your own buy strategies by now!
The successful DE RUSH requires that the majority of your team be able to aim and shoot on the run. Furthermore your team needs to be coordinated enough so that you end up with the situation where 3-5 players from your team are all shooting at the one opposition player simultaneously, thus enabling you to kill each opposition player you encounter with a single shot from each of your own players using a Desert Eagle at medium to close range and assuming you are hitting them! Do not DE RUSH if the majority of your team cannot use the gun well in the situation I have just described, otherwise you are just wasting your money.
1st Round Loss (0-1)
For 2nd Round Don't buy anything ECO RUSH depending upon map, and side you are on.
Terrorists Notes for 2nd Round:
- ECO then AK + Armour 3rd round to get an AK + Armour v MP5 + Armour Battle
- DE RUSH second round and try and win by rushing a site late in the round
- ECO twice, then buy AWP's 4th round
3rd Round
1st Rnd Win, 2nd Rnd Win (2-0)
3rd Round Keep MP5 if you are a Terrorist, the Counter-Terrorists most like going to ECO again. Buy Rifles if you are a Counter-Terrorist depending upon what Opposition might do, and how many times the Terrorists have planted the bomb in the previous two rounds, if the Terrorists planted in the 1st and/or 2nd rounds, then there's a good chance the 3rd round will not be an ECO, top up Grenades (This is map dependant and depends upon whether you are Terrorists or Counter-Terrorists)
1st Rnd Loss, 2nd Rnd Loss (0-2)
3rd Round, maybe buy HE, but otherwise just ECO again or AK RUSH if you ECO previous round (more of an option for Terrorists than Counter-Terrorist, popular strat for Dust2 or so I am told by reliable sources) With new money system, if you plant bomb in either 1st, 2nd or both rounds, then you can do a partial to full BUY UP, since you will have a minimum of $1400 + $1900 + $800 for each bomb plant + kills and left over cash, so long as you fully ECO 2nd Round.
1st Rnd Loss, 2nd Rnd Win (1-1)
Well done, BUY UP on Rifles, unless you already have enemies MP5, as you should be able to get a rifle, armour and a grenade, especially as a Terrorist.
1st Rnd Win, 2nd Rnd Loss (1-1)
Well you stuffed up, now u can either ECO, or MP5 its up to you and depends upon map.
4th Round
1st Rnd Win, 2nd Rnd Win, 3rd Rnd Win (3-0)
BUY UP, Buy Rifle, Get AWP, Buy as many grenades as you can afford, Buy others rifles if you haven't died yet. The other team will have eco'ed Rounds 2 and 3, but now they will have Rifles and Armour too.
1st Rnd Win, 2nd Rnd Win, 3rd Rnd Loss (2-1)
Don't buy anything, check money status of team, then decide whether to ECO or BUY UP.
1st Rnd Win, 2nd Rnd Loss, 3rd Rnd Win (2-1)
BUY UP
1st Rnd Win, 2nd Rnd Loss, 3rd Rnd Loss (1-2)
ECO You are struggling now, you have to save
1st Rnd Loss, 2nd Rnd Loss, 3rd Rnd Win (1-2)
Well Done, BUY UP.
1st Rnd Loss, 2nd Rnd Loss, 3rd Rnd Loss (0-3)
BUY UP after double ECO rounds 2 and 3.
1st Rnd Loss, 2nd Rnd Win, 3rd Rnd Win (2-1)
Well done, BUY UP.
1st Rnd Loss, 2nd Rnd Win, 3rd Rnd Loss (1-2)
Don't buy anything, check money status of team, then decide whether to ECO or BUY UP.
5th Round
If you win 4th Round, you are well on the way to winning the war if this is the 1st half, or you scored 4 or more wins in the 1st half.
Weapons Table
|
Name |
Cost |
Clip Cost |
Clip Capacity |
Max Clips |
Calibre |
Class |
Team |
B |
A B |
HS |
A HS |
Layers |
2nd Fire |
Notes |
| Knife | $0 | $0 | N/A | N/A | N/A | Melee | Both | * | * | * | * | 0 | Stab | Not affected by Armour, Alternate Stab to Back of opponent will kill with a single blow even with full health | H&K USP .45 Tactical | $500 | $25 | 12 | 9 | .45 | Pistol | Both | 4 | 8 | 2 | 2-3 | 0 | Silencer | Default Pistol for Counter-Terrorists. Silencer adds approximately 1-2 shots required for kill | Glock 18 Select Fire | $400 | $20 | 20 | 5 | 9mm | Pistol | Both | 6 | 10 | 2 | 2-3 | 0 | Burst Fire | Default Pistol for Terrorists. Burst Fire is pretty deadly at close quarter combat, but useless at range | SIG P228 | $600 | $??? | ??? | ??? | .357 | Pistol | Both | 4 | 6 | 1 | 2 | 0 | None | Basically a stronger USP in terms of accuracy, maybe a touch more random | Desert Eagle .50 AE | $650 | $40 | 7 | 7 | .50 | Pistol | Both | 3 | 3 | 1 | 1 | 1 | None | Is random for Head Shots but fairly accurate for body, which makes it deadly when whole team is firing | FN Five-Seven | $750 | $??? | ??? | ??? | 5.7x28mm | Pistol | CT's | 6 | 9 | 2 | 2 | 0 | None | Deadly Accurate, but weak for a gun you have to pay for | Dual Beretta 96G | $800 | $20 | 30 | 5 | 9mm | Pistol | T's | 4 | 8 | 1 | 2 | 0 | None | ??? | Benneli M3 Super90 | $1700 | $80 | 8 | 5 | 12 Gauge | ShotGun | Both | 1-2 | 1-2 | 1 | 1 | 0 | None | Kills Full Armour with 1 shot to body if close enough | Benneli XM1014 | $3000 | $80 | 8 | 5 | 12 Gauge | Auto ShotGun | Both | 2 | 2-3 | ??? | ??? | 0 | None | Fast Firing Shot Gun, but does less damage | Steyr Tactical | $1250 | $20 | 30 | 4 | 9mm | Machine Pistol | CT's | ??? | ??? | ??? | ??? | 0 | None | ??? | Ingram MAC-10 | $1400 | $25 | 30 | 3 | .45 | Sub-Machine Gun | T's | 5 | 8 | 1 | 3 | 0 | None | Aim at body and let recoil create the HeadShot | H&K MP5-Navy | $1500 | $20 | 30 | 4 | 9mm | Sub-Machine Gun | Both | 5 | 10 | 2 | 3 | 0 | None | Aim for head pull trigger until clip empty | H&K UMP | $1700 | $80 | 25 | 3 | .45 | Sub-Machine Gun | Both | 4 | ??? | 1 | ??? | 0 | None | Very Accurate with hardly any recoil | FN P90 | $2350 | $50 | 50 | 2 | 5.7x28mm | Sub-Machine Gun | Both | 6 | ??? | 2 | ??? | 0 | None | Does not share ammo with AWP even though officially it's the same round, uses the 5.7x28mm round which is the same as the Five-Seven | Galil / Defender | $2000 | $60 | 35 | 3 | .308 | Rifle | Both | 4 | 4 | 1 | 2 | 1 | None | Shares Ammo with any other 5.56 Calibre Guns Despite what it officially says. An AK is worth the extra $500 if you have the money to spare and can aim | FAMAS / Clarion | $2250 | $60 | 25 | 3 | 5.56 | Rifle | CT's | 4 | 4 | 1 | 2 | 1 | 3 Shot Burst | The 3 shot burst is deadly at long range since the grouping is usually very tight. Personally I'm surprised that it is not more popular considering the price difference between it and the Colt | AK-47 | $2500 | $80 | 30 | 3 | 7.62 | Rifle | T's | 3 | 3 | 1 | 1 | 1 | None | Aim First then shoot. Spray and pray when close quarters since it shreds anything it hits | Colt M4A1 Carbine | $3100 | $60 | 30 | 3 | 5.56 | Rifle | CT's | 4 | 4 | 1 | 2 | 1 | Silencer | Aim First then shoot. Silencer does less damage and makes the crosshair bigger, which may make the gun less accurate. Use Silencer to shoot without giving away location, or to hear when you are hitting opposition through walls | Steyr AUG | $3500 | $60 | 30 | 3 | 5.56 | Rifle | CT's | 4 | 4 | 1 | 2 | 1 | Single Zoom | Accuarcy is good unzoomed. Single shots when zoomed as recoil messes up aim badly | Sig SG-552 Commando | $3500 | $60 | 30 | 3 | 5.56 | Rifle | T's | 4 | 4 | 1 | 2 | 1 | Single Zoom | Accuarcy is good unzoomed. Single shots when zoomed as recoil messes up aim badly. This gun is preferred by aimbotters because of the recoil pattern it exhibits when it is used with an aimbot | Steyr Scout | $2750 | $80 | 10 | 9 | 7.62 | Sniper | Both | 2 | 2 | 1 | 1 | 2 | Double Zoom | The scout is extremely quiet when fired. You are just as fast moving with a scout as a pistol. Do you really need 90 rounds of Scout Ammo? | AI Arctic Warfare / Magnum | $4750 | $125 | 10 | 3 | .338 | Sniper | Both | 1 | 1 | 1 | 1 | 2 | Double Zoom | 1 shot kills except to leg and opponent has more than approx 80% health left | Sig SG-550 Sniper | $4200 | $60 | 30 | 3 | 5.56 | Auto Sniper | CT's | 4 | 4 | 1 | 1 | 1 | Double Zoom | Waste of Money. Basically a Colt with Zoom capability. Unless you score a HeadShot you are going to need to put 3 bullets minimum on target to score a kill with this weapon, which is easier said than done! | H&K G3/SG-1 | $5000 | $80 | 20 | 3 | 7.62 | Auto Sniper | T's | 2 | 2 | 1 | 1 | 1 | Double Zoom | Not bad now, 2 shots kills, basically an automatic Scout with a 20 round clip. Deadly accurate moving and unzoomed. If anything, probably less accurate zoomed than it is unzoomed considering the bullets should be landing on that little red dot on your screen | FN M249 Para | $5750 | $??? | 100 | 2 | 5.56 | Machine Gun | Both | 3 | 3 | 1 | 1 | 1 | None | Not bad as a single shot weapon but spray is bad, and forget about hitting anything while moving. Amusement / Humiliation use only, since there are better things you can spend $6000 on | FlashBang Grenades | $200 | N/A | N/A | 2 | N/A | Grenade | Both | N/A | N/A | N/A | N/A | 0 | N/A | Temporarily blinds everyone in the vicinity. Bounce off walls/boxes to place in correct location | HE Grenade | $300 | N/A | N/A | 1 | N/A | Grenade | Both | 2 | 3-4 | 1-2 | 1-2 | 1 | N/A | High Explosive Grenade. Explosive effects more pronounced in enclosed spaces. Bounce off walls/boxes to place in correct location | Smoke Grenades | $300 | N/A | N/A | 1 | N/A | Grenade | Both | N/A | N/A | N/A | N/A | 1 | N/A | Releases grey smoke for cover. Bounce off walls/boxes to place in correct location | Kevlar Vest | $650 | N/A | N/A | N/A | N/A | Equipment | Both | N/A | N/A | N/A | N/A | N/A | N/A | Protects chest region. Is effective so long as you have armour | Kevlar Vest & Helmet | $1000 | N/A | N/A | N/A | N/A | Equipment | Both | N/A | N/A | N/A | N/A | N/A | N/A | Protects chest and head. Is effective so long as you have armour. The little round circle in the Armour icon tells you that you have a Helmet, although this is bugged sometimes and you do have a helmet even though the icon says you do not | Night Vision Goggles | $1250 | N/A | N/A | N/A | N/A | Equipment | Both | N/A | N/A | N/A | N/A | N/A | N/A | Enhances vision in darkness. For most people, a complete waste of $1250!! | Defuse Kit | $200 | N/A | N/A | 1 | N/A | Equipment | CT's | N/A | N/A | N/A | N/A | 1 | N/A | Used to defuse the bomb quicker. Available to Counter-Terrorists Only, On Bomb Maps Only. Reduces Bomb Defuse time from 10 Seconds to 5 Seconds |
- Calibre: Useful for comparing which guns share ammo, as you can top up MP5 ammo by picking glocks up for example.
- B: On Average Body Shots Required to Kill.
- A B: On Average Armoured Body Shots Required to Kill.
- HS: On Average Head Shots Required to Kill.
- A HS: On Average Armoured Head Shots Required to Kill.
- Layers: How many objects (Including Other Players) a gun can penetrate when firing. Basically tells you whether a gun can shoot through a wall/box or not.
- This table is still very much a work in progress, especially the average kill shots required and I doubt it will ever be 100% complete or accurate nor is it likely to please everybody.
Server Bookings Settings
These are the default server settings for GameArena GameCreate
- Game: Counter-Strike
- Date: Date you want your GameCreate Server
- Time: AEST (Sydney) Time GameCreate server will be available
- Run time: How long the server will be available to you for. If you cannot get 2 hours sometimes picking a shorter run time will get you a booking at a more favourable time.
- Booking name: [ClanName] Prac
- Maximum players: 13
- RCON password: This is the RCON password, don't ever give this out!!
- Client password: This password is required by all players attempting to connect to the server
- Map: Pick Any of the War Maps
- Timelimit: Unlimited
- Win limit: Unlimited
- Round time: 1.75 minutes
- C4 Timer: 35 secs
- Friendly fire: Ticked
- Freeze time: 7 secs
- Buy time: 30 secs
- Fade to black: Unticked
- Hostage penalty: 0
- Kick percent: 0
- Limit teams: 0
- Map vote ratio: 0
- Teamkill punish: Off
A War Config file can be found here war.cfg put it in your \steam\steamapps\your@email\counter-strike\cstrike\ directory.
Once you have put the RCON password in, type in console "exec war.cfg" and standard war settings will be applied.
DO NOT RUN THIS CONFIG FILE ON AN OFFICIAL LADDER SERVER, THE SETTINGS WILL BE CORRECT AND YOU WILL GET FORFEITED IF YOU DO CHANGE ANY SERVER VARIABLES!
- Keypad Plus Does rcon say "Live after 3 restarts"
- Keypad Enter Does a 1 second restart
- Keypad 5 Does a 3 seconds restart and says LIVE! LIVE!! LIVE!!!
Edit the war.cfg file with notepad if you want to change which keys are bound.
Common RCON Commands
Counter-Strike 1.6 RCON Commands
rcon_password rcon password here(Gives RCON ACCESS for the person who enters this correctly)rcon sv_password new client password here(Sets new Client password you use to get into the server)rcon say say something via RCON here(This is how you say something via rcon)rcon sv_restart 1(Restarts level in 1 second)rcon sv_restart 3(Restarts level in 3 second)rcon changelevel "War Map Name"(Changes server to War Map Name, see below for correct names of maps)rcon kick #user(Kicks user by the user number)rcon kick STEAM_X:X:XXXXX"(Kicks user by the STEAM/UNIQUE ID)rcon kick "playername"(Kicks user by 'playername')rcon banid 10 STEAM_X:X:XXXXX kick(Bans and Kicks player by STEAM_ID for 10 minutes)rcon removeip x.x.x.x(Removes automatic IP Ban of somebody who forgets to put the RCON Password in, but tried to use RCON)rcon status(Shows a complete list of players with all their details)rcon stats(Shows server CPU usage and FrameRate, and useful when trying to work out if you server has a problem)rcon quitQuits the server. (Useful if you have really screwed things up and don't know how to fix it)
Counter-Strike Source RCON Commands
rcon_password rcon password here(Gives RCON ACCESS for the person who enters this correctly)rcon sv_password new client password here(Sets new Client password you use to get into the server)rcon say "say something via RCON here"(This is how you say something via rcon and you must use the "quotes" or it will look bad)rcon mp_restartgame 1(Restarts level in 1 second)rcon mp_restartgame 3(Restarts level in 3 second)rcon changelevel "War Map Name"(Changes server to War Map Name, see below for correct names of maps)rcon kickid #user(Kicks user by the user number)rcon kickid STEAM_X:X:XXXXX"(Kicks user by the STEAM/UNIQUE ID)rcon kick "playername"(Kicks user by 'playername')rcon banid 10 STEAM_X:X:XXXXX kick(Bans and Kicks player by STEAM_ID for 10 minutes)rcon removeip x.x.x.x(Removes automatic IP Ban of somebody who forgets to put the RCON Password in, but tried to use RCON)rcon status(Shows a complete list of players with all their details)rcon stats(Shows server CPU usage and FrameRate, and useful when trying to work out if you server has a problem)rcon quitQuits the server. (Useful if you have really screwed things up and don't know how to fix it)
Abuse of rcon kick and rcon banid (on GameArena) will result in the person abusing RCON being banned from The Arena!
EVERYTHING is logged, so don't think we won't catch up with you when somebody complains!
Before running scripts that execute any rcon commands, do a rcon say TEST and the server should repeat the word TEST back to you. If it does not, you have not entered the correct rcon password.
If you try to use rcon repeatedly (like using a script) without the correct password, your IP address will be banned from that server for 10-15 minutes.
Once the server unbans you, do not attempt to use RCON for the remainder of the time the server is up, even with the correct password, you will most likely get banned again. Bugs in HLDS, go figure?
You can be unbanned manually by having somebody else (who has entered the correct rcon password) issue the rcon removeip x.x.x.x command where x.x.x.x is your real Internet IP address.
War Map Names
- de_aztec
- de_cbble
- de_dust
- de_dust2
- de_inferno
- de_nuke
- de_prodigy
- de_train
We would probably use CPL maps if there was any CPL presence/support in Australia, but that the moment there is nothing, so its a bit pointless using CPL maps. How about a bit of CPL love? :)
Other Server Settings
rcon mp_allowspectators 1(0=Disables Spectators, 1=Allows Spectators)rcon mp_autoteambalance 0(0 Disables Team AutoBalancing, 1=Auto Balance the Teams)rcon mp_buytime 0.5(The amount of time in minutes you are alllowed to buy after the end of the freezetime. 0.5 = half of a minute)rcon mp_c4timer 35(The amount of time in seconds from when the C4 is armed until it blows)rcon mp_fadetoblack 1(0=Disables Fade to Black, 1=Fade to Black On)rcon mp_forcecamera 1(0=Disabled, 1=On in team first person view, 2=Locked to death position)rcon mp_freezetime 7(The amount of time in seconds the players are frozen for at start of the round)rcon mp_friendlyfire 1(0=Friendly Fire Disabled, 1=Friendly Fire Enabled)rcon mp_limitteams 0(0=Disable Limiting of Teams, Any other number = Max # of players 1 team can have over another)rcon mp_maxrounds 999(Maximum number of rounds to play before server changes maps)rcon mp_roundtime 2.5(The number of minutes each round takes, in this case 2 Minutes and 30 Seconds)rcon mp_startmoney 800(The Amount of money each player gets upon a map restart)rcon mp_timelimit 999(The Amount of time in Minutes the map will run for)rcon mp_tkpunish 0(0=Disables Team Kill Punishment, 1=Disables Team Kill Punishment)rcon mp_winlimit 999(The Maximum Amount of Rounds that one team can win before the map changes)
DO NOT CHANGE SERVER SETTINGS ON AN OFFICIAL LADDER SERVER, THE SETTINGS WILL BE CORRECT AND YOU WILL GET FORFEITED IF YOU DO CHANGE ANY SERVER VARIABLES!
Common Binds
This section will guide you through setting up a basic Counter-Strike Config.
All your configs and scripts and aliases should be in the file userconfig.cfg which is located in your \steam\steamapps\your@email\counter-strike\cstrike\ directory.
We'll begin with the ubiquitous wait commands. Most scripts will use wait aliases something like this.
Waits
- //waits
- alias w1 "wait"
- alias w2 "w1; w1"
- alias w3 "w1; w2"
- alias w4 "w2; w2"
- alias w5 "w2; w3"
- alias w10 "w5; w5"
Its important to note that anything on the same line after // in a config file is ignored by Counter-Strike (in fact, is ignored by almost all scripting languages). This is designed to allow commenting in a script, as I've done.
Buy Binds
All you need to add to your userconfig.cfg file is the following:
The general format of a bind expression is: bind "some-key" "some-alias" - It is important you use the quotes!
Here are some examples of single key buy binds:
- bind "F3" "deagle"
- bind "F4" "mp5"
- bind "F7" "defender; w5; clarion"
- bind "F6" "ak47; w5; m4a1" // Bind a key to m4a1 for Counter-Terrorists, or AK47 for Terrorists
- bind "F7" "awp"
Here are some examples of buy binds using aliases:
- //Buy Binds
- alias gren01 "hegren; w5; buyammo1; w5; flash; w5; flash; w5; sgren" //Buys All Grenades
- alias defs01 "defuser" //Buys Defuse Kit since there is nothing worse than buying night vision
- alias armr01 "vest; w5; devon" //Buys Vest Only
- alias armr02 "vest; w5; buyammo1; w5; vesthelm" //Buys Full Armour
Then binding those aliases to a key:
- bind "F9" "gren01"
- bind "F10" "defs01"
- bind "F11" "armr01"
- bind "F12" "armr02"
Built-In Weapon Aliases
Below is a list of all the Weapon Aliases that are automatically built into Counter-Strike.
(Do not put this section in your userconfig, just select what you need, and use that)
- Built in Alias - Description
- glock - Glock 9x19mm Sidearm
- usp - USP .45 Tactical
- p228 - 228 Compact
- deagle - Desert Eagle .50C
- elites - .40 Dual Elites
- fiveseven- ES Five-Seven
- m3 - M3 Leone 12 Gauge Super
- xm1014 - Leone YG1265 Auto Shotgun
- mp5 - MP5 Sub-Machine Gun
- tmp - TMP Schmidt Machine Pistol
- mac10 - Ingram MAC-10
- ump45 - KM UMP45
- p90 - ES C90
- defender - IDF Defender
- clarion - Clarion 5.56
- m4a1 - Colt M4A1 Carbine
- aug - Steyr Aug Bullpup
- ak47 - AK-47
- sg552 - SIG 552 Commando
- scout - Schmidt Scout
- awp - AWP Magnum Sniper Rifle
- g3sg1 - D3/AU1 Auto-Sniper Rifle
- sg550 - SIG 550 Auto-Sniper Rifle
- m249 - M249 Para
- primammo - Primary Ammo
- secammo - Secondary Ammo
- vest - Kevlar
- vesthelm - Kevlar+Helmet
- flash - Flashbang
- hegren - HE Grenade
- sgren - Smoke Grenade
- nvgs - Nightvision
- defuser - Defusal Kit
- shield - Tactical Shield
Select and Say Binds
Grenade / FlashBang Scripts
- //HE Grenade Selecting Script
- alias grenny "weapon_hegrenade"
- //FlashBang Selecting Script
- alias flashy "weapon_flashbang; say_team Throwing a Flashbang Take Cover!"
Here is how to bind it:
- bind "MOUSE5" "grenny"
- bind "e" "flashy"
Radio Binds
All you need to do is bind them directly to a key, or create an alias to string multiple radio commands together.
Radio Bind Examples:
- bind "e" "enemyspot"
- bind "q" "needbackup"
- bind "r" "takingfire"
Radio Binds as Aliases Example:
- //enemy spotted script
- alias enemy "e_spot"
- alias e_spot "enemyspot; w10; needbackup"
- bind "q" "enemy"
Built-In Radio Aliases
Below is a list of all the Radio Aliases that are automatically built into Counter-Strike.
(Do not put this section in your userconfig, just select what you need, and use that)
Radio 1
- coverme - Cover me!
- takepoint - You take the point!
- holdpos - Hold this position!
- regroup - Regroup team!
- followme - Follow me
- takingfire - Taking fire, need assistance!
Radio 2
- go - Go go go!
- fallback - Team, fall back!
- sticktog - Stick together!
- getinpos - Get in position and wait for my go!
- stormfront - Storm the front!
- report - Report in team!
Radio 3
- roger - Roger that!/Affirmative!
- enemyspot - Enemy spotted!
- needbackup - Need backup!
- sectorclear - Sector Clear
- inposition - I'm in position.
- reportingin - Reporting in.
- getout - Get out of there, it's gonna blow!
- negative - Negative!
- enemydown - Enemy Down!
Other Useful Scripts
Here are scripts for taking screenshots and creating demos
- //Takes ScreenShot
- alias screeny "screen"
- alias screen "snapshot"
- bind "F5" "screeny"
- //Drops Console Takes Screenshot of Status Screen
- alias con_d "toggleconsole; w10; w10; w10; status; w10; w10; w10; snapshot; w10; w10; w10; toggleconsole"
- bind "del" "con_d"
- //Drops Console Takes Screenshot of RCON Status Screen (includes IP) (You need to have input your rcon password first before using this)
- alias con_d "toggleconsole; w10; w10; w10; rcon status; w10; w10; w10; snapshot; w10; w10; w10; toggleconsole"
- bind "del" "con_d"
- //Drops Console Takes Screenshot of Status Screen and Starts Demo
- alias con_d "toggleconsole; w10; w10; w10; rcon status; w10; w10; w10; snapshot; w10; w10; w10; toggleconsole"
- alias recdemo "recon"
- alias recon "csdemo; alias recdemo recoff"
- alias recoff "stop; devon; echo Demo Complete!; devoff; alias recdemo recon"
- alias csdemo "csdemo01"
- alias csdemo01 "con_d; w20; record FirstHalf; devon; echo Recording First Half of War; devoff; alias csdemo csdemo02"
- alias csdemo02 "con_d; w20; record SecondHalf; devon; echo Recording Second Half of War; devoff; alias csdemo csdemo01"
- bind "ins" "recdemo"
Pressing the insert key will create the First Halves Demo, Pressing the insert key again will stop it.
Once you have completed the First Half and changed sides, Pressing the insert key will start the Second Halves Demo, Pressing the insert key again will stop it.
The Finished Config
So in the end, this is what your userconfig.cfg file ought to look like, if you have followed my examples:
- //Start of userconfig.cfg
- //waits
- alias w1 "wait"
- alias w2 "w1; w1"
- alias w3 "w1; w2"
- alias w4 "w2; w2"
- alias w5 "w2; w3"
- alias w10 "w5; w5"
- //Buy Binds
- bind "F3" "deagle"
- bind "F4" "mp5"
- bind "F7" "defender; w5; clarion"
- bind "F6" "ak47; w5; m4a1"
- bind "F7" "awp"
- alias gren01 "hegren; w5; buyammo1; w5; flash; w5; flash; w5; sgren" //Buys All Grenades
- alias defs01 "defuser" //Buys Defuse Kit
- alias armr01 "vest; w5; devon" //Buys Vest Only
- alias armr02 "vest; w5; buyammo1; w5; vesthelm" //Buys Full Armour
- bind "F9" "gren01"
- bind "F10" "defs01"
- bind "F11" "armr01"
- bind "F12" "armr02"
- //HE Grenade Selecting Script
- alias grenny "weapon_hegrenade"
- bind "MOUSE5" "grenny"
- //FlashBang Selecting Script
- alias flashy "weapon_flashbang; say_team Throwing a Flashbang Take Cover!"
- bind "e" "flashy"
- //Enemy Spotted Script
- alias enemy "e_spot"
- alias e_spot "enemyspot; w10; needbackup"
- bind "q" "enemy"
- //Screenshot and Demo Scripts
- alias screeny "screen"
- alias screen "snapshot"
- bind "F5" "screeny"
- alias con_d "toggleconsole; w10; w10; w10; rcon status; w10; w10; w10; snapshot; w10; w10; w10; toggleconsole"
- bind "del" "con_d"
- alias con_d "toggleconsole; w10; w10; w10; rcon status; w10; w10; w10; snapshot; w10; w10; w10; toggleconsole"
- alias recdemo "recon"
- alias recon "csdemo; alias recdemo recoff"
- alias recoff "stop; devon; echo Demo Complete!; devoff; alias recdemo recon"
- alias csdemo "csdemo01"
- alias csdemo01 "con_d; w20; record FirstHalf; devon; echo Recording First Half of War; devoff; alias csdemo csdemo02"
- alias csdemo02 "con_d; w20; record SecondHalf; devon; echo Recording Second Half of War; devoff; alias csdemo csdemo01"
- bind "ins" "recdemo"
- //End of userconfig.cfg
Other Notes
- When warring, take a screenshot of "rcon status" to get the STEAM_ID and IP address of people playing.
- Record demos of your wars to review later, either for hacking accusations or to see what you could have done better or show everybody how 1337 you are. Do this so you can share them amongst your own clan, and can see how people are good in a particular spot, aim and throw grenades, etc. Use the 1 Key Demo script shown above, so you can take demos without having to think too hard about it.
- Review the HLTV demos of the top clans and clans you are going to challenge in the GameArena Counter-Strike Ladder.
- You can download these HLTV demos from GameArena Counter-Strike Files.
Everything explained above, is more or less valid for Public (Pub) Server Play as well, if you want to try that hard! I personally use pub to practice movement/positioning, and just plain old aiming!
Any feedback you might have about this guide, feel free to post a message in this thread on the GameArena Counter-Strike Forum. (GameArena Login Required)
People who ask me in a war what I mean when I call anything I have explained in this document will get tk'ed.
Why this Guide was created:
There are lots of clans in the GameArena Counter-Strike Ladder full of players who can aim and have good reflexes, but they still lose wars to clans that it can be argued they should not, mainly due to the errors pointed out in this document, and/or a lack of team work. Eg. Like buying colts after a 1st round win as Counter-Terrorists and having no armour, no grenades and no defuse kits, just like you would on pub. :)
It was also created because although I may not be an expert on what needs to be done to win wars, I can safely say I am an expert at knowing what will lose you wars, having made and continue to make a lot of these mistakes myself and also being the unfortunate witness and completely innocent bystander to a lot of these common mistakes.
This guide is only a start, the only way to improve at playing Counter-Strike in Wars is to play a lot of wars with your chosen clan mates as often as possible, also to be honest with yourselves to know when you made mistakes and learn from them, or to know you have been outclassed and/or outskilled. It is handy to know that to be able to pick a good clan from a mediocre clan, war them on train/nuke/cbble/prodigy because every wannabe n00b clan and their dogs know dust2 and inferno.
On one other note, for all the 1337 players out there, I've had some interesting conversations with Lemming about different war strats and the such, and he commented that this guide doesn't leave much room for individual brilliance. I agree with his sentiments, but this guide wasn't written for the Lemmings of this world, so I leave it to you, the readers, to decide whether I succeeded in providing any worthwhile advice.
Finally, feel free to constructively criticise what I have written here if you feel you have something useful to say or you think some of my logic is flawed. If you must say something critical, please explain why I am incorrect and offer an alternative explanation if you don't agree. To all the E-tough guys out there, I only have one thing to ask you, where are your strat guides, or don't you have the guts to put your opinions on the line and held up to the scrutiny of others?
P.S. A lot of what I have written here may seem obvious and common sense. Unfortunately that has not been my experience, and I think they should re-label common sense, uncommon sense, because it is unlikely you will not see many of the mistakes outlined here when playing in a war.
NB: This is a living breathing document which may change from time to time as the author remembers new things, is introduced to new idea's, or is just not happy with something and re-writes it for the hell of it. Its worthwhile re-checking the entire document from time to time to see if anything has changed. The version number indicates what sort of changes have been made. An X.0.0 change indicates a major change. An 0.X.0 change indicates I have added or changed content that makes a difference. An 0.0.X change means I fixed a spelling, grammar or formatting mistake.
Special Thanks to from AusGamers / GameArena for helping me with all the html and css formatting/coding :)
Cheers
-
Counter-Strike Addict have read this page so far